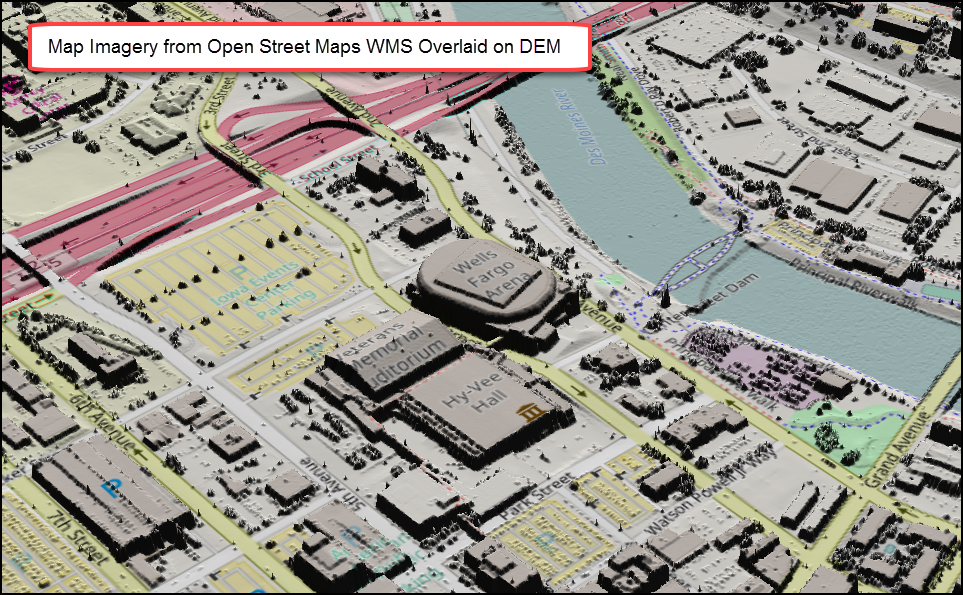
Applied Imagery is pleased to announce the release of Quick Terrain Modeler v8.0.7. The central themes for v8.0.7 are Imagery, Editing, Information, and Analysis. Feel free to download the “What’s New for QT Modeler v8.0.7.0” or contact us for more details.
New Tutorial – Troubleshooting Graphics
We have added a tutorial video to help troubleshoot graphics issues. We sometimes see QT Modeler struggling unnecessarily to render large point clouds, DEM’s and imagery. Frequently, there is a very simple (and free!) solution such as switching to your discrete GPU (NVIDIA or AMD) and/or updating your graphics driver. Take a look here: Troubleshooting Graphics
QT Modeler Marker Icons and Stencils – New Tutorial
Check out the new tutorial video on marker icons and stencils – two very helpful tools for annotating your 3D scenes. Go to the tutorial page and click on the “General” tab. …or Click Here
Applied Imagery Has Released Quick Terrain Modeler v8.0.6!
August 2, 2016
Applied Imagery has released Quick Terrain Modeler v8.0.6. We have added many things our users have been asking for – subfolders in the layer tree, marker icons, KMZ imagery support, etc. – but, by far, the biggest thing we changed was “under the hood”. We completely revamped the way Quick Terrain Modeler handles point clouds (LAS/LAZ/BPF files), enabling users to load much larger point clouds. Strangely, we (almost) hope users never notice this at all. Everything will look and feel the same, all of the analytical tools will work the same, but you might just notice that you are loading way more data than you did before.
Read on for more details, download the “What’s New for v8.0.6” PDF, and watch the “What’s New in v8.0.6” video. As always, we thank you for using QT Modeler and for providing your extremely valuable feedback and suggestions.
Sincerely,
The Applied Imagery Team
What’s New for Quick Terrain Modeler Version 8.0.6:
Bigger Point Clouds! Quick Terrain Modeler v8.0.6 dramatically reduces the memory footprint of point clouds, also known as LAS, LAZ, and BPF files. Depending on the point cloud data and what attributes are included (e.g., intensity, RGB color values, etc.), the memory footprint for point clouds will be between 30% and 50% of what it used to be, enabling the loading of point clouds two to three times the size (measured in number of points) in the same amount of memory. All of this should be invisible to you. All the visualization and analytical tools work the same, QT Modeler still loads and renders every single point, and you will still get the effortless interaction and navigation you have come to expect from us.
Smart Textures – No Need to “Stack Rank” Your 2D Images! In QT Modeler terminology, “textures” are 2D imagery files that you overlay on your 3D data (or just load by themselves). In v8.0.6, Quick terrain Modeler will assess areas where multiple textures overlap, and automatically display the “best” texture (i.e., the one with the highest resolution). There is no longer a need to manually organize the texture list in the layer tree to display the best texture (unless you want to).
KMZ Image Support QT Modeler now supports the overlay of a wide variety of KMZ imagery, even KMZ images that consist of many small “chips” or “tiles” – like imagery from MOBAC or applications that export to GPS devices. If possible, QT Modeler will merge the small tiles together into a single texture in the layer tree. In addition, QT Modeler will find KMZ imagery during searches.
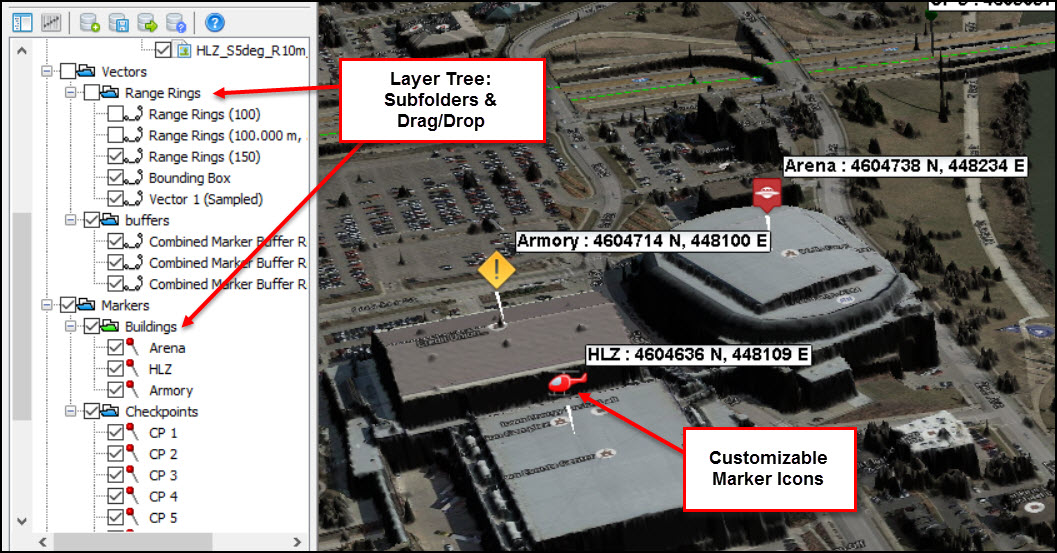
Layer Tree – Get Organized! You asked, we listened. The layer tree now supports subfolders and drag & drop of items. It will be easy to organize your markers, vectors, models, and routes into subfolders, then turn them on/off as a group. Right click on a folder (e.g., the “Markers” folder in the layer tree) to create a subfolder. Drag and drop items into and out of folders as needed.
Markers: Tired of every marker just looking like a push pin? V8.0.6 offers unlimited possibilities for marker display. We have 3 basic “Styles” now: Pushpin (the way it has always been), Text Tag, and Icon, which opens up a world of annotation possibilities. In Icon style, you can choose any image to be the marker icon. We have included many useful icons, but you will be able to use any image as an icon by dropping it into the QT Modeler “icon” folder.
More good stuff for markers:
- Double right click on any marker to open the Edit Marker window.
- Rename/resequence entire marker subfolders (quickly resequence route check points).
- Set marker coordinate display precision to any number of decimal points (File Menu > Options/Settings > Set Display Units).
- Marker Manager can now highlight only the markers visible in the current scene/view.
Google Earth Sync – Easier & Syncs More Stuff!: Google Earth continuous synchronization has been enhanced dramatically:
- Now you can just click the Google Earth button to synchronize Google Earth. We have a new button icon: No need to go to the Control Menu > Control mode. One-time Google Earth synchronization still works by typing “G” on the keyboard.
- Range Rings, flight surfaces, bounding boxes, and routes now automatically sync to Google Earth. e., as you add these items into QT Modeler, they immediately appear in the Google Earth window. Any edits to names, folder structure, colors, or positions of these items will immediately be reflected in Google Earth
- Note: Any other vector types will need to be manually exported by right clicking and exporting to KML.
Route Planning Enhancements: A couple new enhancements for planning routes:
- When placing a route and there is a need to go “off the screen”, QT Modeler’s movement mode will pan the scene when the mouse cursor hits the edge. No need to hold down ALT and move the model.
- When automatically placing checkpoint markers, the checkpoints can be created in their own folder in the layer tree, making it easier toad check points in the middle of a route, reset the order in the layer tree, and rename/renumber them sequentially.
Resize Legend – Make Presentations Easier to Understand! You can now resize the legend by clicking on the legend icon in the Layer Tree > Special Overlays folder. Slide the slider to resize the legend. This will make QTM briefings and exported PowerPoint slides easier for your audience to understand.
Volume Calculations – Better for Point Clouds: Volume calculations have been completely revamped to allow choices in how point cloud volumes are calculated (surface model methods are unchanged). You can now select Min/Mean/Max Z to create the temporary surface from which QTM calculates volumes. Point cloud volume calculations should be much more accurate and flexible.
Setting Display Precision: QT Modeler v8.0.6 allows users to set the precision (i.e., number of decimal places) of various display readouts. Found in File Menu > Options/Settings > Set Display Units.
LAS File Enhancements – Editing Synthetic and Withheld Points: QT Modeler v8.0.6 adds the ability to set/edit Withheld, Synthetic and Keypoints from three places: The Point Query Tool (SHIFT + Click on a Point), from the Point Select Menu (CTRL + SHIFT multiple points, then CTRL + Right Click), and from the Profile Tool (in Edit Mode in the Profile window).
Version 8.0.5.2 Is Now Ready! (February 2016)
Applied Imagery has been busy with two “minor” releases since the release of QT Modeler version 8.0.5 in October, 2015. Version 8.0.5.1 came out in December to fix a few minor bugs – but also to add very useful new capability such as buffer areas around markers, enhanced range rings, and an optional magnetic north on the compass. Version 8.0.5.2 was released in February, 2016 to introduce two significant new capabilities – the editing plane and a “Resample Texture” (i.e., “sharpen 2D image) capability. We also fixed a few bugs along the way. Read on for more details.
New Features/Tools – Version 8.0.5.1 & 8.0.5.2:
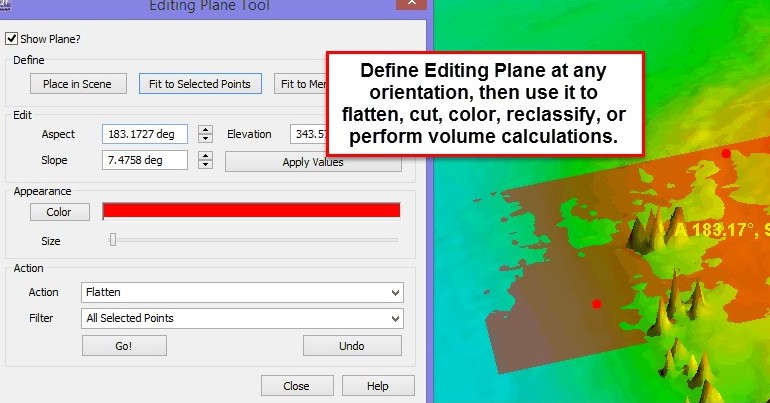
- Editing Plane: The Editing Plane is a very flexible tool to define a plane at a custom angle or “tilt”, then use that plane to edit the model. The editing functions that are available are flatten, cut, recolor, or reclassify. These functions can be applied to all points in the selection area, or just to points above or below the surface of the plane. The Editing Plane can also be used as part of a volume calculation (i.e., calculate volumes above/below the plane – good for cut/fill operations).
- Resample Texture: QT Modeler’s Resample Texture capability enables an easy way to sharpen a texture that has been downsampled. Simply load a large texture (smaller textures may not need to be downsampled), then zoom to a specific area and click the resample texture button. QT Modeler will go back to the original image file, carve out (aka “chip”) the smaller portion of the image, and add it to the scene at the highest resolution possible. Note that the original texture will still be present in the scene, but the small chip will be “on top” of the larger, lower resolution texture. You will see the resampled texture in the Layer Tree Textures Folder in a subfolder called “Temp”. Note: Resample Texture is built in to the tactical toolbar, but will need to be added to the default toolbar.
- Buffer Regions around Markers and Measurement Line: Simple tool to create and merge a circular perimeter of all visible markers. The user defines the perimeter distance and QTM draws the merged line. This was in response to evaluate threats and visibility around a facility but can have many other uses. It has been used in a transportation application to assess streetlight lighting coverage down a road (markers represent light posts, buffers represent lighting coverage for each light post – buffer evaluates total lighting coverage). This buffer tool foreshadows additional buffer tools to come – around lines, polygons, selection areas, etc. – in a future release. Right click the marker folder in the layer tree to access this tool.
- Enhancement of Range Rings: Added the ability to extend the cross hairs out to the edge of the rings. The new option will appear in range ring tool.
- (Optional) Magnetic North Compass: This is important to pilots, whose onboard instrumentation relies on magnetic north to establish their heading. Magnetic north depends on where you are on the earth. Compared to true north, magnetic north can be the same, or it can vary significantly (tens of degrees). Note that if magnetic north is turned on, the orientation of the range ring cross hairs will be aligned with magnetic north. Right click on Compass in “Special Overlays” folder and select “Magnetic”.
- New Movement Mode – Zoom to Cursor: CTRL + Mouse Wheel Zoom will zoom to the cursor position, not the center of the screen
- APASS/ATAK: Tweaked the export formats a bit based on SOCOM feedback of desired file formats for APASS (routes now exported to GPX) and new export folder structures for ATAK. Export Menu > Export to APASS/ATAK, or use APASS/ATAK buttons.
Version 8.0.5 is Ready!
October 12, 2015: Quick Terrain Modeler Version 8.0.5 is now available! This release will have a little something for everyone, but the general themes are:
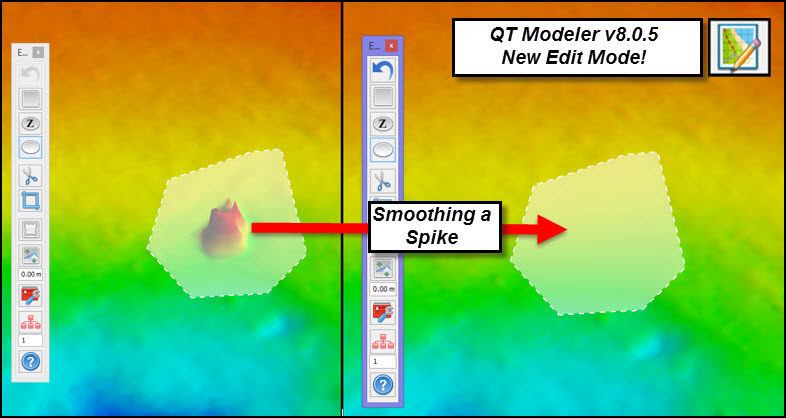
Surface Model (DEM/DSM/DTM) and Point Cloud Editing: Quick Terrain Modeler v8.0.5 brings all of our point cloud and DEM editing tools together in a new “Edit Mode” and consolidated, floating Edit Toolbar. Point cloud cleanup (removing noise, reclassifying points) and/or DEM editing (spike removal, smoothing water) will be faster and easier than ever. “UNDO” has improved, too – it now undoes up to 10 edits and applies to smoothing and flattening.
Coordinate Conversion: Coordinate conversion will be extremely easy in v8.0.5. Data with mismatched coordinate systems can be converted upon loading the data, entire projects can be converted to a new coordinate system and/or vertical datum, and the status bar can display elevations based on WGS84, EGM96, EGM08, MSL, or NAVD88 – no matter what vertical datum the original data used. All of these tools enable the user to easily load multiple, varied data sets into the same scene, and “speak” the coordinate system and/or vertical datum language of any downstream customers.
Route Planning: Route planning and analysis continues to get easier and faster in v8.0.5, with automated check point generation, faster ways to edit routes, an enhanced Travel Route Analysis Tool (TRAT), more route information, and the addition of 3D threat domes.
Search: QT Modeler’s powerful search tool just got better. It now searches 3D data (point clouds, DEM’s), 2D imagery, and vector data all at the same time, allows users to sort the search results many ways, and loads the data into the 3D scene all at once. Government users should inquire about a GOTS plugin called “GQ” that also enables searching and loading data from the GRID LiDAR data portal from QT Modeler’s search interface.
NITF Imagery: QT Modeler is now capable of extracting and interpreting RPC projection information from NITF, GEOTIFF, and other formats which support it. Where possible QT will use the RPC to extract a full projection matrix rather than using an orthorectified approximation. This means users can project off-nadir NITF imagery onto a 3D DEM or point cloud as easily as loading an ortho image.
Rendering: QT Modeler v8.0.5 will have more responsive rendering, particularly for very large DEM’s. Overlaying imagery on point clouds will likely be much sharper. And v8.0.5 will have better support for very large (1 Billion +) point clouds.
Thanks for all of your suggestions and feedback. Please keep your great ideas coming and let us know what you think of Quick terrain Modeler v8.0.5!
Sincerely,
The Applied Imagery Team
Please read our “What’s New in Quick Terrain Modeler v8.0.5” information sheet or Watch the What’s New v8.0.5 Video for more details. As always, we appreciate all of your feedback and suggestions. Please keep the great ideas coming!
Version 8.0.4 Is Now Available!
January 6, 2015: Quick Terrain Modeler Version 8.0.4 is now Available! With v8.0.4, Applied Imagery continues to enhance our users’ workflows by accelerating common tasks, adding analytical tools, and, in general, making life easier:
Bigger!
Digital Elevation Models (DEM’s, DSM’, etc.) will now consume 40% – 60% less memory, thus enabling analysis of even bigger areas.
Faster!
We have achieved significant speed upgrades by implementing improved multithreading and other techniques. You will see these improvements in in commonly used tasks such as point cloud loading, Helicopter Landing Zone (HLZ) calculation, Line of Sight (LOS) calculation, image (texture) import, cut/crop, area statistics calculation, and many other functions.
Easier!
- Interactive Vectors: All vectors will now be interactive in the 3D scene. This means selecting, dragging, rotating entire vectors and/or individual nodes.
- Flight Surfaces & Bounding Boxes: Entirely new tools that will enable users to define rectangles and visualize “flight surfaces” for a more comprehensive HLZ/LZ flight planning experience, as well as easy identification of obstructions to aircraft approach.
- Route Planning Revamped: Route planning will be much simpler and will no longer display markers at every turn point. Now you will simply create a measurement line, edit the line, then convert to a “QT Route” – no confusion about what markers belong to what route.
- Distances in meters and heights in feet – at the same time!: By user demand, measurements can now be made in separate units for vertical and horizontal objects. For example, a route could be measured in the 3D scene and the distance would display in meters, but vertical change would display in feet.
Please read our “What’s New in Quick Terrain Modeler” information sheet or Watch the What’s New v8.0.4 Video for more details. As always, we appreciate all of your feedback and suggestions. Please keep the great ideas coming!
Skilet Cover
Cras tristique turpis justo, eu consequat sem adipiscing ut. Donec posuere bibendum metus. Quisque gravida luctus volutpat.
Continue readingRevolver Template
Cras tristique turpis justo, eu consequat sem adipiscing ut. Donec posuere bibendum metus.
Continue readingDesign Annual 2015
Cras tristique turpis justo, eu consequat sem adipiscing ut. Donec posuere bibendum metus. Quisque gravida.
Continue reading
